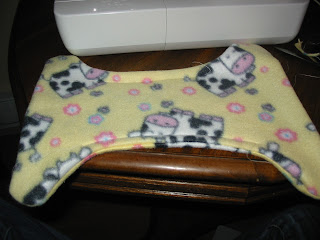
As you may or may not know, we have our third child due to arrive this June, I've never cloth diapered a newborn before, but since DD developed such a sever allergie to disposables, I don't want to risk using sposies for even the first few weeks this time. Good news is I got to build a newborn stash, bad news is I needed everything and with DH not working I didn't exactly have a great budget for new diapers. I couldn't bring myself to buy a bunch of newborn covers since this will likely be our last baby so I sat down at the sewing machine and this is what I came up with.
 So far I've only made newborn covers with this pattern but I think I will make some Large ones soon as DD's medium wraps don't fit over a premium prefold very well and I want some matching for both girls.
20 minute diaper cover
Materials Needed
Sewing machine
Fleece or wool interlock (upcycled wool suit jackets work great) and thread
12" length of 1/2" wide elastic
6 socket snaps and 5 stud snaps and and caps
Snap pliers or press
or
7" loop and 3" of hook aplix or touch tape and your choice of fastener for the cord snap down
Step 1 - make your pattern
I will post the pattern I used once I get it digitized, but in the mean time you can make your own pattern to fit by simply tracing one of your fitted diapers and adding 1 1/2 inches all around. You may find it easier to make a pattern of half of a diaper folded lengthwise so that is fits on a legal sized peice of paper, or you can use a paper grocery bag to make your pattern.

Step 2 - cut your fabric
Cut two peices for each cover. layer the fabric wrong sides together and pin.

Step 3 - sew your 2 layers together
Using a straight stitch on your sewing machine stitch around the outside of your fabric staying as close to the edge as you can. Start on the top edge of the front wings and go around to the other top edge leaving a 4 or 5" opening in the front top edge. Turn fabric rightside out.

Step 4- Elastic
I prefer to make elastic casings vs stitching the elastic directly into a project, mainly because no matter how much I practise I still always end up stitching through the elastic and redering it useless. Elastic casings are just easier and more fool proof for people like me. If you prefer you could stictch the elastic directly in and save a couple of steps, or you can play it safe like I do and sew in 8" elastic casings in each leg opening and a 6" one in the center of the back edge of the diaper cover. Use a safety pin to feed the elastic into the casing. Secure one end of the elastic with a straight stitch. Pull the elastic tight and secure the other end with a straight stitch, trim excess elastic. Repeat for both legs and back edge.


Step 5 - Finish
Top stitch the opening you left in the front of the diaper cover and add your snaps or aplix. I prefer snaps so that is what I've done here. I have placed 7 socket snaps, caps in, along the front edge of the diaper cover, 2 studs, caps out, on each tab, and a single stud, cap in, directly under the center snap of the front in order to secure the cord stump fold down.


 If you are using aplix you will attach a 5" strip of loop along the front of the cover, 1 1/2" of hook on each tab and 1" of loop on the inside of the back edge to secure the aplix in the wash. You will also need to attach some sort of fastener to the center front of the cover to create a cord stump dip, that could be a button or a sew on snap or you could even sew it down if you really want too.
Do you use this cover directly over the cloth diaper? It does not leak or absorb the liquid? I am a grandma who used the vinyl pants over the cloth diapers and will have two grandchildren born this year and both mothers want to use cloth diapers. Thanks for the great tutorial.
ReplyDeleteHi all,
ReplyDeleteNice picture! Thanks for this information. The diaper cover provides the protection your child needs from leaks that may result when wearing a diaper.
Adult Diapers
This is a great article. I’ve read in many
ReplyDeleteother places before that but
I did not get this type of effective and
more useful text. It is really important now to
vary your anchors as this seems more natural to user.
This article helped me a lot to understand information.